5 Common Mistakes to Avoid When Cleaning the Camera Sensor
Introduction
In digital photography, a clean sensor is crucial for achieving sharp, spotless images. Over time, dust and debris naturally find their way onto the sensor, particularly when changing lenses or shooting in outdoor environments. These particles can cause tiny spots or dark patches to appear in your photos, diminishing their quality and adding time-consuming retouching steps in post-processing. That’s why cleaning the camera sensor regularly is an essential maintenance task for photographers who want consistently clear and professional-looking results.
However, sensor cleaning is not as simple as dusting off a lens or wiping down a camera body. The camera sensor is one of the most sensitive and expensive parts of your camera, so it requires a careful, precise approach. Many photographers are understandably hesitant to attempt cleaning on their own, fearing they might damage their equipment or void their warranty. And while professional cleaning services are an option, they can be costly and time-consuming, especially if your camera frequently needs attention.
This post is here to help you take control of your camera’s upkeep without risking harm. We’ll walk you through five common mistakes photographers often make when cleaning their sensors, along with easy solutions to avoid them. With a bit of know-how and the right tools, you can safely manage sensor cleaning and keep your camera functioning at its best, resulting in consistently sharp and spot-free images.
Affiliate Disclaimer
This blog post may include links to affiliate sites. If you click on an affiliate link and make a purchase, we may earn a small commission or receive other compensation at no extra cost to you. Please note that many of the links on our site are affiliate links. Our use of these links does not impact the products, services, or websites we recommend to you. This disclaimer covers all forms of communication with you, including our website, email, phone, social media, products, and other platforms.
Mistake 1: Using the Wrong Cleaning Tools
When it comes to cleaning the camera sensor, using the wrong tools is one of the most common mistakes photographers make. The camera sensor is a highly sensitive component, and it requires specialized care. Many photographers, especially beginners, may be tempted to use household items like microfiber cloths, cotton swabs, or even canned air to clean their sensors. Unfortunately, these items can cause more harm than good. Let’s look at the reasons why these common tools aren’t suitable and explore the best options for cleaning the camera sensor safely and effectively.
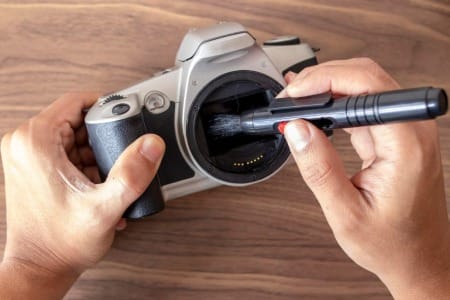
Why Common Tools Aren’t Safe for Sensor Cleaning
· Household Cleaning Cloths: While microfiber cloths are great for cleaning lenses or screens, they’re not ideal for sensors. These cloths can carry lint, which may end up stuck on the sensor, leaving behind more particles than before. Additionally, their rougher fibers might scratch the sensor’s protective glass.
· Cotton Swabs and Tissues: Many photographers assume that a cotton swab, lightly moistened, would be harmless. However, cotton swabs can shed fibers onto the sensor, creating even more tiny dust particles. Tissues pose a similar issue and can also leave a residue that is difficult to remove without specialized cleaning fluid.
· Compressed Air Cans: Using canned air is one of the riskiest choices for cleaning the camera sensor. While it might seem effective for blowing dust away, the high-pressure air can damage the sensor or even displace other internal components. Additionally, canned air can release a cooling chemical mist that leaves residue on the sensor, requiring even more cleaning to remove.
Recommended Tools for Safe Sensor Cleaning
The best way to approach cleaning the camera sensor is to invest in high-quality, specialized tools designed specifically for this purpose. Here are some key items that will help you clean safely and avoid damage:
· Air Blower: A hand-squeezed air blower, such as the popular Giottos Rocket Blower, is perfect for gently removing dust from the sensor without touching it directly. Unlike compressed air, these blowers use natural airflow, allowing you to blow dust off without risking damage or residue.
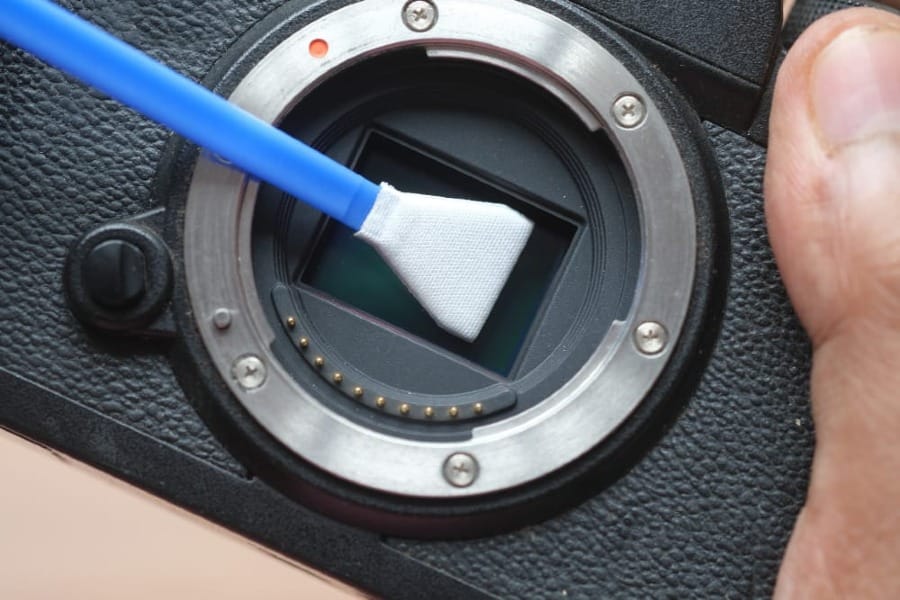
· Sensor Cleaning Swabs: These are specially designed for cleaning camera sensors and come in different sizes to match various sensor formats (full-frame, APS-C, etc.). They have soft, lint-free tips that allow you to apply gentle pressure and cover the sensor surface without leaving fibers behind.
· Sensor Cleaning Solution: Approved sensor cleaning solutions are formulated to clean without leaving streaks or residue. Just one or two drops are enough to moisten a cleaning swab before use. Make sure to avoid using excessive fluid, as too much can seep into the camera body and cause internal damage.
How to Properly Use These Tools
To start cleaning the camera sensor, begin with the air blower to remove loose dust and particles. Hold the camera upside down and gently squeeze the blower, directing air onto the sensor. This will help dislodge particles without any direct contact.
If the blower alone doesn’t achieve a clean sensor, proceed with a moistened sensor cleaning swab. Lightly dampen the swab with an approved sensor cleaning solution—only one or two drops are necessary. Gently swipe across the sensor in one direction, then turn the swab to use a clean side for a second pass. Avoid applying excessive pressure, as this could damage the sensor or its protective coating.
By avoiding common household items and investing in proper cleaning tools, you significantly reduce the risk of damaging your sensor. Cleaning the camera sensor doesn’t have to be intimidating, but it does require using the right products to ensure a safe and effective clean. Remember, a clean sensor means clearer images and less time spent retouching, making the right tools well worth the investment.
Mistake 2: Skipping the Initial Dust Blow-Off
When it comes to cleaning the camera sensor, many photographers make the mistake of diving straight in with a swab or cloth. Skipping the initial dust blow-off may seem harmless, but it’s actually one of the quickest ways to scratch your sensor. Dust particles, especially if abrasive, can leave permanent marks if rubbed across the sensor’s surface. This simple step—using an air blower to remove loose particles before physically touching the sensor—can save you from costly repairs and help ensure a more effective clean. Let’s break down why this step is critical and how to approach it effectively.
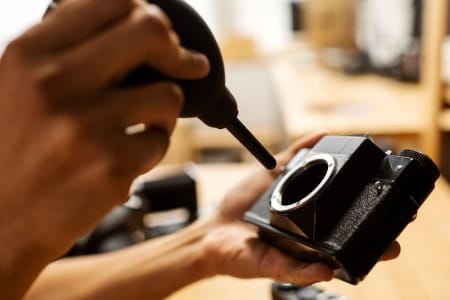
Why Skipping Dust Blow-Off Can Be Harmful
· Risk of Scratches: Even tiny dust particles can be surprisingly abrasive. When you skip the initial blow-off, those particles sit on the sensor’s surface, ready to be dragged across it as soon as you use a swab. This can lead to minor scratches, which over time accumulate and may degrade image quality.
· Pushing Dust Deeper: If the sensor has a protective filter, dust can sometimes settle around its edges. Skipping the blower can push dust particles even deeper into the camera, making them harder to remove and increasing the risk of leaving dust behind even after cleaning.
· Higher Chance of Residue: Using a wet cleaning method without blowing off dust first can cause particles to mix with the cleaning solution. This often leads to residue streaks, requiring multiple cleaning passes and potentially increasing the chance of accidental damage.
Using an Air Blower: The Best First Step for Cleaning
Before you begin cleaning the camera sensor, an air blower should always be your first tool of choice. Here’s why and how to use it effectively:
· Why Use an Air Blower? Air blowers create a gentle, controlled stream of air to dislodge dust without physically contacting the sensor. Unlike canned air, which can be too forceful and may leave residue, manual air blowers are designed specifically for sensitive equipment and provide just enough airflow to remove loose dust.
· Choosing the Right Air Blower: Look for a hand-squeezed air blower like the Giottos Rocket Blower. Avoid mini blowers with weak airflow, and always steer clear of high-powered compressed air cans, as they can damage the sensor with excessive force or introduce residue.
How to Use the Air Blower Properly
1. Power Off the Camera: When cleaning the camera sensor, start by turning off the camera. Many models engage an automatic sensor-cleaning mode upon power-off, which can help loosen any stubborn particles.
2. Hold the Camera Upside Down: To maximize effectiveness, hold your camera upside down so that any dislodged dust falls away from the sensor rather than settling back onto it. This helps remove dust rather than just moving it around.
3. Use Controlled Bursts: Squeeze the air blower in short, controlled bursts, aiming directly at the sensor without touching it. It’s important to avoid pressing the blower too close to the sensor; about an inch away is ideal to ensure gentle airflow without introducing any contaminants from the blower itself.
When to Move Beyond Dust Blowing
If you find that some particles remain even after using the air blower, you may need to proceed with a cleaning swab. However, completing this initial step first will significantly reduce the risk of scratching or smearing dust across the sensor when you do move to physical contact.
By starting each session with an air blower, you create the best possible conditions for cleaning the camera sensor. This simple but effective step reduces the chance of damage and helps you get a spotless sensor with minimal effort. Cleaning the camera sensor may seem straightforward, but taking the time to do a dust blow-off first is key to keeping your equipment in top shape and ensuring that every shot you take is as clear as possible.
Mistake 3: Applying Too Much Pressure
Applying too much pressure when cleaning the camera sensor is a common mistake, especially for photographers new to sensor maintenance. It’s understandable—when we’re trying to remove stubborn spots or smudges, a natural instinct is to press harder. However, the camera sensor is extremely delicate, and even though most sensors have a protective layer, excessive pressure can damage this coating, scratch the surface, or even affect the underlying electronics. Let’s dive into why a gentle touch is essential and how to use the right technique for effective, pressure-free cleaning.
Why Excessive Pressure is Dangerous for Sensors
· Delicate Sensor Components: Camera sensors are built with precision, and even a minor scratch can impact image quality. The thin protective layer on most sensors is designed to guard against dust but isn’t equipped to withstand heavy-handed cleaning. Applying too much pressure can leave permanent scratches and marks or even impact the sensor’s performance.
· Risk of Smearing: When you press down too hard while cleaning the camera sensor, there’s a greater chance of smearing or spreading particles around instead of removing them. This creates a residue that can require multiple cleaning passes to clear, increasing the likelihood of further damage.
· Internal Impact: Heavy pressure doesn’t just affect the sensor’s surface; it can also impact internal components, like the mounting mechanism or even the delicate circuitry inside. This can lead to alignment issues or, in the worst cases, costly repairs.
The Right Technique for Gentle Sensor Cleaning
When cleaning the camera sensor, adopting the correct technique is crucial to avoid unnecessary pressure. Here are a few tips to ensure you’re cleaning safely:
· Choose High-Quality Cleaning Swabs: Opt for sensor cleaning swabs that are specifically designed for your sensor size (full-frame, APS-C, etc.). These swabs are manufactured to cover the sensor with a single swipe, reducing the need for multiple passes and minimizing the risk of applying excessive force.
· Use Minimal Fluid: Excessive cleaning fluid can encourage pressing harder to remove streaks. Just a single drop of sensor-safe solution is usually enough. This allows the swab to glide smoothly without creating a sticky or smeared surface that might tempt you to press down harder.
· Let the Swab Do the Work: When using a swab, gently swipe across the sensor in one smooth motion. Avoid going back and forth repeatedly over the same spot, as this can increase pressure over time. Instead, if you need to do a second pass, flip the swab to the clean side or use a new swab to avoid pressing in any dust particles.
Practicing a Light Touch
Practicing on a less sensitive surface, such as a lens filter, can help you gauge the right amount of pressure. When cleaning the camera sensor, only a feather-light touch is needed. Imagine you’re barely brushing the surface, letting the swab or blower tip do the majority of the work without your hand pushing forcefully.
Knowing When to Seek Professional Help
If you find yourself struggling with stubborn spots or smears that don’t seem to come off with a gentle pass, it may be time to consider professional sensor cleaning. Cleaning the camera sensor at home is manageable for dust and minor particles, but sticky or oily spots (such as those from atmospheric pollution or environmental factors) can be trickier and may require specialized tools.
By avoiding excessive pressure and using the right technique, you’re not only protecting your camera sensor but also maintaining its longevity. Cleaning the camera sensor can be intimidating, but a light touch and the right tools make it a safe and effective process. Remember, the goal is not to scrub the sensor but to gently lift away dust and debris, leaving you with a spotless sensor and clear, sharp images.
Mistake 4: Using Excessive Cleaning Solution
One of the most common mistakes photographers make when cleaning the camera sensor is using too much cleaning solution. It’s easy to assume that more liquid will provide a better clean, especially if there are stubborn spots on the sensor. However, over-saturating a sensor cleaning swab can do more harm than good, potentially causing damage to the sensor or leaving behind residue that’s hard to remove. Knowing how to use cleaning solution sparingly and correctly is key to effective and safe sensor cleaning. Let’s explore the risks of using too much solution and learn the best way to approach this essential step.
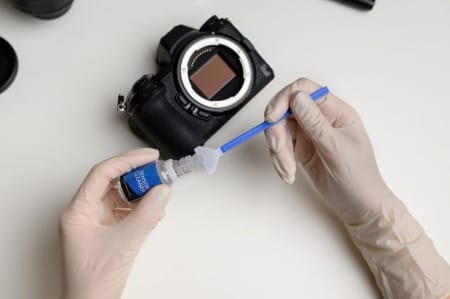
Why Using Excessive Solution Can Cause Problems
· Risk of Solution Seepage: Camera sensors are sensitive electronic components with tight, intricate connections. When cleaning the camera sensor with too much solution, there’s a risk that the liquid will seep into the edges of the sensor, potentially reaching other electronic parts within the camera body. This can lead to electrical damage, corrosion, or malfunction, which are often costly to repair.
· Residue and Streaking: Excess solution often leaves behind streaks or a filmy residue. Cleaning the camera sensor is intended to provide a spotless finish, but when too much solution is applied, it often results in a smeared or hazy appearance. This creates the need for additional cleaning passes, which not only risks damaging the sensor but also wastes cleaning supplies.
· Inconsistent Results: Too much solution can actually interfere with the swab’s performance. Sensor swabs are designed to work effectively with just a small amount of fluid, allowing for an even and gentle pass across the sensor surface. When oversaturated, swabs may leave uneven streaks or accumulate residue that makes it harder to achieve a pristine clean.
How to Properly Apply Sensor Cleaning Solution
When using a sensor cleaning solution, remember that less is more. Here’s the best approach to applying the correct amount:
· Choose an Approved Sensor Cleaning Solution: Ensure you are using a cleaning fluid specifically designed for camera sensors. Avoid general-purpose cleaners or alcohol, as these can contain ingredients that damage the sensor coating or leave behind residues.
· Use Just a Drop or Two: Apply only one or two small drops of solution to the swab. Sensor cleaning solutions are designed to be effective with minimal fluid. This small amount is sufficient to loosen dust or smudges without oversaturating the swab, which helps you avoid streaking.
· Distribute Evenly on the Swab: To ensure an even clean, gently spread the solution across the swab tip by squeezing or pressing it lightly. This prevents any pooling of liquid on the swab and provides a uniform pass across the sensor.
Steps for Safe, Controlled Sensor Cleaning
1. Start with an Air Blower: Begin by blowing off any loose dust particles before applying any cleaning solution. This minimizes the number of particles the swab has to pick up, reducing the need for multiple passes and helping you avoid the temptation to apply excess solution.
2. Apply a Light, Even Swipe: After moistening the swab with a small amount of solution, gently swipe across the sensor in a single, smooth motion. Avoid going back and forth, as this can add unnecessary friction and pressure on the sensor.
3. Use a Clean Swab for Additional Passes: If the sensor isn’t completely clean after the first pass, don’t reapply the solution to the same swab. Use a new, lightly moistened swab for each additional pass to maintain control over the amount of solution on the sensor surface.
When to Seek Professional Help
If stubborn spots remain even after using the correct amount of solution, it may be time to consider professional sensor cleaning. Cleaning the camera sensor at home is feasible for routine dust and minor smudges, but some residues, especially oily or sticky substances, can be challenging to remove and may require specialized equipment.
By limiting the amount of cleaning solution and using it sparingly, you can avoid the common pitfalls of oversaturation. Cleaning the camera sensor effectively doesn’t mean soaking it in fluid; rather, a precise application allows for a thorough cleaning without risking damage or residue. Taking a minimalistic approach with a cleaning solution ensures that your sensor stays on top.
Mistake 5: Ignoring Static Issues
When cleaning the camera sensor, static electricity is often overlooked, yet it plays a significant role in attracting dust and other particles to the sensor surface. Sensors can become charged during the cleaning process or even just from environmental factors, causing dust to quickly resettle even after a thorough cleaning. Ignoring static issues can lead to a frustrating cycle of cleaning and recleaning, as dust seems to cling persistently to the sensor. Understanding how to manage static can make sensor cleaning much more effective, leaving you with clearer results and less time spent on touch-ups.
How Static Affects Sensor Cleaning
· Dust Attraction: Sensors are inherently vulnerable to dust, but static electricity amplifies this by drawing dust and tiny particles directly onto the sensor. This is particularly problematic when you’re cleaning the camera sensor in dry environments, such as air-conditioned rooms, or in places with lots of synthetic materials that generate static. Without addressing static, dust particles will keep returning to the sensor, even after multiple cleaning attempts.
· Increased Cleaning Difficulty: When static is present, using an air blower or a cleaning swab can actually make things worse by moving particles around without effectively removing them. You may think your sensor is clean, only to find more dust the moment you look through your viewfinder or review your shots. This leads to repeated cleaning, which increases the risk of accidentally scratching or damaging the sensor.
· Potential for Smearing: Static electricity can also cause smears during wet cleaning, as the cleaning solution may spread unevenly due to the charge. This can create streaks on the sensor, which can be difficult to remove and may require additional passes, further complicating the process of cleaning the camera sensor.
Tools and Techniques for Reducing Static
To avoid static-related issues when cleaning the camera sensor, certain tools and techniques can help you manage and reduce static effectively:
· Anti-Static Brushes: Special anti-static brushes are designed to remove dust without adding a static charge. These brushes work by neutralizing the static as they move across the sensor, making them particularly effective for loosening particles that are clinging due to electrical charge. Brands like VisibleDust offer anti-static brushes specifically designed for sensor cleaning.
· Use Anti-Static Gloves: Wearing anti-static gloves can prevent the transfer of charge from your hands to the sensor, especially if you are in a dry environment or wearing synthetic clothing that generates static. These gloves are inexpensive and provide an extra layer of control over the cleaning process, helping you avoid unintentional static buildup.
· Consider a Humidifier: If you regularly clean your sensor in a very dry environment, using a humidifier can help reduce static in the air. A slightly more humid environment will make dust particles less likely to cling to surfaces, including your sensor. Just be cautious not to introduce excess humidity, as this could affect your camera’s internal components.
Steps to Reduce Static While Cleaning
1. Turn Off the Camera: Before cleaning the camera sensor, always turn off the camera completely. Some cameras have a built-in mechanism to discharge static when powered down, which can help reduce dust attraction.
2. Hold the Camera in a Neutral Environment: Avoid cleaning in very dry or carpeted areas, as these tend to generate static. If possible, clean your sensor in an area with hardwood or tile floors, as these materials don’t produce as much static.
3. Use an Anti-Static Swab: For the actual cleaning, using an anti-static sensor swab with minimal cleaning solution can help avoid static buildup. The swab’s material should be specifically designed for sensors and treated to reduce static, which helps prevent dust from clinging back onto the sensor during cleaning.

Knowing When to Re-Clean or Seek Professional Help
If static continues to be a problem despite taking these precautions, you may need to consider a professional sensor cleaning. Professional services often have access to anti-static equipment and controlled environments that can eliminate dust more thoroughly. Additionally, cleaning the camera sensor too frequently in a high-static area increases the risk of scratches, so a professional service can provide a deeper, safer clean when required.
By addressing static electricity, you can make cleaning the camera sensor a more efficient and frustration-free process. When static is managed correctly, dust won’t reattach as quickly, allowing you to enjoy cleaner shots and clearer images without constant sensor maintenance. Taking a few simple precautions to manage static can go a long way in keeping your sensor free from dust and ready for any shooting situation.
Conclusion
Cleaning the camera sensor is a vital maintenance task for photographers who want clear, spot-free images. While it may seem intimidating at first, understanding common mistakes—such as using the wrong tools, skipping the initial dust blow-off, applying too much pressure, using excessive cleaning solution, and ignoring static—can make the process far safer and more effective. By following these guidelines and using the correct tools and techniques, you can keep your sensor in optimal condition without risking damage. Remember, a clean sensor means less time spent in post-processing and more confidence in capturing sharp, dust-free shots. For particularly stubborn debris or challenging cleaning situations, don’t hesitate to consider professional cleaning services, as they can provide thorough, expert care. With a careful approach, you’ll protect your equipment’s longevity and continue capturing stunning, flawless images with ease.
Thank you for visiting our site and being part of this journey with us! We rely on the generous support of visitors like you to continue providing high-quality. Your donation, no matter the size, helps us maintain the website and create more valuable resources for everyone.

